Showing posts with label diy. Show all posts

Wednesday, August 10, 2011

DYI: Apple Marshmallow Pops

Send your kids away to school with these pretty treats!

These apple marshmallow pops are sure to make everyone smile ;)


You need:

10 lollipop sticks
1 bag of red candy melts (white chocolate)
green colored fondant
mini pretzels
marshmallows
red sugar crystals
What to do:

1. Insert a lollipop stick into the marshmallow {to make lollipops}

2. Make mini green leafs using the green fondant. Make 10 tiny bowls (about 1/4 inc each), then roll each of them with the same lollipop stick and mold into a leaf shape with your own hands. Trace a leaf pattern with a toothpick.


3. Cut the mini pretzels into tiny sticks

4. Place the candy melts into a microwave safe bowl and melt for 1minute or less. Cover each marshmallow pop with the melted candy melt. Immediately coat it with red sugar crystals.


5. Add a pretzel stick and a mini leaf on top with a little pressure to make sure they are touching the melting chocolate that will help them stay in place. Set aside on a wax paper for about 20 minutes.

So cute...I feel like trying this in apple green next time :D

Enjoy!!
xoxo


Wednesday, April 20, 2011

DIY: Peep ♥ Kebabs

An original way to celebrate Easter Sunday...Let your family indulge in some Peep♥Kebabs!!

{Sticky fingers free!!}


They are adorable!!

What you need

♥ As many PEEPS as you want!
♥ Bamboo skewers
♥ Ribbon
♥ Marshmallows


What to do

♥ Take your PEEPS out of their package and pull them apart, making sure they keep their unique shape :)
♥ Place them in a ziploc bag to save you time for when you're ready to make your Peep♥Kebabs. Or you can make your treats 30 minutes before your guests arrive. This is to prevent them from drying.
♥ Cut ribbon and tie a bow in each bamboo skewer.


♥ Now ready to assemble! Alternate the Peeps colors for a prettier look, add some marshmallows in between {as seen on picture} and have fun!


♥ Ready ♥

Enjoy!!
xoxo

Tuesday, December 14, 2010

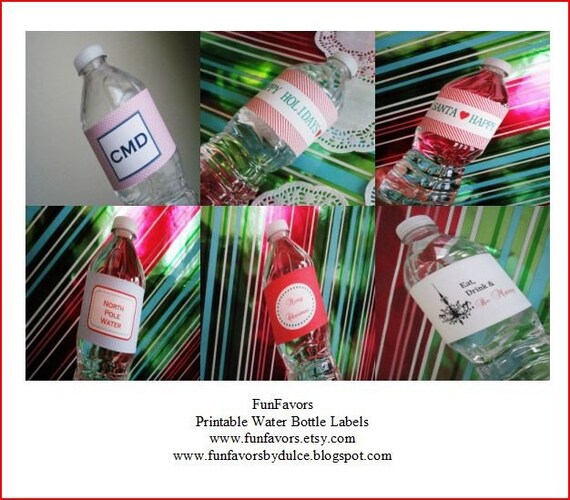
DIY: Printable Holiday Water Labels


A very easy way to add fun to your Holiday Bar without breaking your budget is personalizing your drinks!!

 They look fabulous and all of your guests will love the special touch!


PRINT * CUT * PASTE


xoxo

DIY: Doilie Gift Bow

Got gifts? ...Now wrap them with a with a beautiful handmade bow made out of doilies!!


You will need:

4 Doilies (8" diameter)
Staples
Clear Tape

What to do:

1. Take 2 doilies and pair them together.
2. Fold them in half.
3. Crinkle the bottom with 3 mini folds.
4. Seal the mini folds with a staple.
 5. Open the doilies apart as if you're trying to form a flower.
6. Repeat all steps with the other 2 doilies.
7. Use clear tape to attache them together or directly to your gift!!

In less than 5 minutes... you get a Beautiful Vintage Inspired Bow!

Enjoy!!

*Next week I will share more ideas on how to use doilies for your Holiday's Decor!!

xoxo


Monday, December 13, 2010

Chocolate Covered Cookie Lollipops

Make your own yummy Chocolate Covered Cookie Lollipops!

I made these treats over the weekend and they tasted amazing :)

Here's the tutorial for you to make them in time for Christmas..they look adorable!


Your guests will be in for a double treat with these ones!

What you need:
1 batch of cookie dough
1 cookie cutter (any shape you love!)
White lollipop sticks
Chocolate candy melts (I used milk chocolate flavor because my cookies had a Gingerbread man shape)
M&M's (for the buttons)
Wax paper
1 Baking tray
1 Tray to place inside fridge
Microwave safe dish to melt chocolate melts


What to do:

1. Spread the cookie dough and cut cookies with your cookie cutter.
2. Add a lollipop stick to each cut cookie dough, creating a lollipop and place in tray baking tray allowing 1" in between for perfect baking. Bake them for 10 minutes.
3. Let your cookie lollipops cool off for about 30 minutes.
4. Melt chocolate candy in your microwave safe dish. Dip cookie lollipops in the chocolate, help yourself with a small spatula or spoon.
5. Tap the lollipop to make sure you get rid off the excess chocolate from dipping.
6. Place chocolate covered cookies in a tray already covered with wax paper.
7. Decorate by adding M&M's and other sprinkles, royal icing or white chocolate.
8. Place them in the fridge for 15-20 minutes or until the chocolate hardens.


Really fun to make...

Enjoy!!

xoxo


Blog Template by YummyLolly.com