Showing posts with label candy. Show all posts

Tuesday, October 11, 2011

DIY: Candy Corn Cake

Candy Corn is a Halloween classic, so it is a no brainer to make a Candy Corn inspired cake for your Spooky Party!!


It's really easy, you can make it the day before your party!

You will need:
2 Vanilla Cake rounds (I used 8" cake pans)
4 cups of vanilla buttercream
Food coloring gels (orange, yellow and black)
1 cake stand
Wax paper
Small spatula (if you don't have one, you can use a butter knife)
Scissors
Pastry bags or zipploc bags

Hands on:

1. Place one of the 8" round cake on your cake stand and topped with buttercream  (this will be the filling of the cake).
2. Place the second 8" round cake on top of your iced cake to form a 4"-5" high cake.
3. Place your cake on the fridge for about 30 minutes (if it stays longer than that is ok! you're doing this so your cake gets firm and ready to be frosted.
4. In the meantime color one cupcake of buttercream frosting with yellow, another one with orange and a third one with black gels.
5. Fill your pastry bags with the buttercreams. You will have 1 bag with yellow buttercream, and the other two with orange and black respectively.
6. Bring your cake out of the fridge. Covere completely with white vanilla frosting.
 7. Cut a wax strip and cover the top of your cake around, leaving a 1.5" to frost with yellow icing (as shown on pic)
8. Now you can cover the bottom of your cake with yellow icing and smoothly do it so all around your cake.
9. Remove wax paper after step 8 and repeat with the orange icing.
10. You will have a cake with yellow, orange and white stripes. To smooth your edges and have a clean cake use your spatula and a damp napkin and go around your cake as needed, cleaning your spatula each time to remove excess icing.
11. Now the fun part, use your pastry bag filled with black icing (cut a small part of the tip or you can use a pastry tip #2or3 will do). Trace lines form one edge to the other to form a spider web.
12. Once your spider web is done...add a spooky spider with your black icing and add a border to your cake too!!

Hope you guys really make this fun cake...and if you do don't forget to share your creations with us on our FB page!!

Enjoy!!
xoxo


Thursday, December 23, 2010

Thursday Party: Winter Candyland

Wonderful Eye Candy via Fresh Chick Designs!!

Look at Rebecca's beautiful Winter Candyland party she created for her son Blake...it's so dreamy and playful!!

I have a major crush on this cake :)
Love when cakes are decorated with sugar cookies!!


Enjoy!!

xoxo

Tuesday, December 7, 2010

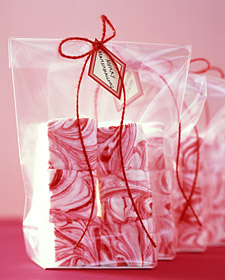
Candy Cane Marshmallows

Look at these homemade Candy Cane Marshmallows!! aren't they just beautiful? 
These will make a great impression with your guests this Holiday Season!


Ingredients

Makes sixteen 2-inch squares
  • Vegetable-oil cooking spray
  • 2 cups sugar
  • 1 tablespoon light corn syrup
  • 4 packages (1/4 ounce each) unflavored gelatin
  • 3/4 teaspoon peppermint extract
  • 2 large egg whites
  • 2 teaspoons red food coloring

Directions

  1. Coat an 8-inch square pan with cooking spray; line bottom with parchment paper. Coat the parchment with cooking spray, and set pan aside. Put sugar, corn syrup, and 3/4 cup water in a small saucepan. Cook over medium heat, stirring, until sugar is dissolved. Stop stirring; let mixture come to a boil. Raise heat to medium-high; cook until mixture registers 260 degrees on a candy thermometer.
  2. Meanwhile, sprinkle gelatin over 3/4 cup water in a heatproof bowl; let stand 5 minutes to soften. Set the bowl with the gelatin mixture over a pan of simmering water; whisk constantly until gelatin is dissolved. Remove from heat, and stir in extract; set aside.
  3. Beat egg whites in the bowl of an electric mixer fitted with the whisk attachment until stiff (but not dry) peaks form. Whisk gelatin mixture into sugar mixture; with mixer running, gradually add to egg whites. Mix on high speed until very thick, 12 to 15 minutes.
  4. Pour mixture into lined pan. Working quickly, drop dots of red food coloring across surface of marshmallow. Using a toothpick, swirl food coloring into marshmallow to create a marbleized effect. Let marshmallow stand, uncovered, at room temperature until firm, at least 3 hours or overnight. Cut into squares.
Read more at Marthastewart.com: Candy-Cane Marshmallows - Martha Stewart Holidays

Enjoy!!

xoxo

Monday, December 6, 2010

Mustaches & Heels - Engagement Party

I designed this Dessert Table for my first Bridal Show! 

The theme: Mustaches & Heels  - Engagement Party

I wanted to create something fun for both Bride & Groom without making it too formal...so I though of Mustaches to represent the groom (a very trendy icon for parties these days) and high heels for the Bride...because most of us are shoe lovers!

The Color Scheme: Turquoise, Red, White and Yellow accents 


The sweets:

Chocolate cake adorned with a Cake Banner
Cinnamon Cupcakes with turquoise fondant drops adorned with a Mini Bunting
Sugar Cookies assorted shapes: Mustaches, Heels, Hearts

Invitations, paper goods and favors find them in my shop

Enjoy!!

xoxo


Blog Template by YummyLolly.com